AI-Generated Article
This content has been automatically generated using artificial intelligence technology. While we strive for accuracy, please verify important information independently.
Putting faces down on paper, or on a digital canvas, is a truly rewarding thing to do, yet, so many folks find one particular part a bit tricky to get just right: the nose. It's often seen as a really tough bit of the face to draw, perhaps because it sticks out and has all these subtle curves and shadows. But honestly, with a few helpful pointers and a bit of practice, you can get much better at making noses look natural and convincing in your pictures.
This guide is put together to help you, whether you're just starting out with your drawing tools or you've been sketching for a while and just want to sharpen your skills a little. We'll go through some straightforward ways to approach this sometimes-frustrating facial feature. You'll get to see how to draw a nose from the front, from a slight angle, and even from the side view, which is called a profile, so you can add more depth to your portraits. We’ve even got some insights from a professional artist, Kelly, who has some pretty neat ways of thinking about it, too it's almost like she can see the nose in its simplest forms.
We believe that anyone can learn to draw a nose that looks real and full of character. It's all about breaking things down into smaller, easier pieces and seeing the basic shapes that make up something as complex as a human nose. We've gathered some truly simple, step-by-step instructions that will show you how to draw a nose without all the fuss, helping you build confidence with each line you make. So, get your pencils ready, because we’re about to make drawing noses a lot less intimidating.
Table of Contents
- Meet the Artist - Kelly's Approach to Drawing a Nose
- Why is Learning How to Draw a Nose So Important?
- How Can You Break Down the Nose's Structure?
- Getting Started - Simple Steps for How to Draw a Nose from the Front
- What About Noses from Different Views?
- Tips for a More Lifelike How to Draw a Nose
- Practicing Your How to Draw a Nose Skills
Meet the Artist - Kelly's Approach to Drawing a Nose
A Bit About Kelly
We had a chance to chat with Kelly, a truly talented artist who has spent many years refining her approach to portraiture. She often talks about how the nose, despite its apparent straightforwardness, can be one of the most expressive parts of a person's face. Kelly believes that getting good at drawing a nose isn't about copying every tiny detail, but rather about really seeing the underlying forms and how light plays across them. She's known for her friendly teaching style and her knack for making complex ideas seem quite simple, which is why we thought her perspective would be so helpful here. She basically says, "Look for the big shapes first."
Kelly's Insights
Kelly's way of looking at how to draw a nose is pretty insightful, actually. She breaks down the challenge into some easy-to-think-about ideas. Here’s a little bit of what she shared with us:
| Topic | Kelly's Viewpoint on How to Draw a Nose |
|---|---|
| Starting Point | Always begin with very light, simple shapes – circles, boxes, or even just straight lines to get the overall placement. This helps you build the nose without feeling overwhelmed. |
| Seeing Forms | Think of the nose not as a flat drawing, but as a three-dimensional object sticking out from the face. It has a bridge, which is kind of like a ramp, and then the tip, which is often a ball-like shape, and then the wings for the breathing holes. |
| Light and Shadow | Pay close attention to where the light hits the nose and where the shadows fall. These are what give the nose its shape and make it look like it's really there. A little shading can go a very long way, you know. |
| Variety is Key | Remember that every nose is unique. Don't try to draw the "perfect" nose; instead, observe the particular qualities of the nose you are trying to capture. This makes your drawings more lifelike and interesting, too it's almost like giving each person their own special look. |
- Julia Berolzheimer House
- Shooters Clothing
- Finley Point Farms
- Sadboyz Clothing
- No Boxing No Life Website
Why is Learning How to Draw a Nose So Important?
Getting Good at Drawing Noses
Well, to be honest, the nose is a really big part of how someone's face looks, isn't it? It sits right there in the middle, and its shape can tell you a lot about a person's appearance. If you can get the nose right, it helps make the whole face look much more believable and, in a way, more alive. It adds character and depth to your portraits. Without a well-drawn nose, a face can feel a bit flat or even strange, you know, like something is just not quite right. It’s one of those bits that, once you get a handle on it, really helps your overall drawing abilities grow.
Many artists find that once they can draw a nose that looks good, the rest of the face seems to fall into place more easily. It's like a central anchor for all the other features. The space between the eyes, the curve of the cheeks, and the way the mouth sits – all of these relate to the nose. So, taking the time to learn how to draw a nose well is a pretty good investment in your art skills generally. It really helps you to understand facial structure as a whole, too, which is very useful.
How Can You Break Down the Nose's Structure?
Simplifying How to Draw a Nose
Drawing a nose from the front, especially when you're just starting, can feel a bit like trying to solve a puzzle with too many pieces. But here's a clever way to make it much simpler: think of the nose not as one big, complex thing, but as a few basic shapes put together. This idea comes from the way professional artists often approach things, breaking down something complicated into its most fundamental forms. It’s a bit like building with blocks, really. You start with the big, simple ones, and then add the smaller details later. This method helps you get the proportions and placement right before you even think about the finer points.
So, instead of getting caught up in all the tiny curves and shadows right away, we're going to look at the nose as if it's made up of spheres, boxes, and cylinders. This kind of thinking helps you to "see" the nose in a way that makes it easier to draw. It’s about getting the general shape and how it sits on the face first, which is a really important step. Once you have those basic forms in place, you can then add the details that make it look like an actual nose. This method is often how people learn to draw a nose without getting too frustrated, and it works for many different kinds of noses, too.
The Three Main Bits of the Nose
Understanding How to Draw a Nose from Basic Shapes
To truly get a handle on how to draw a nose, it helps to think of it as having three main parts. Imagine the nose as a kind of simple structure, like a little building on the face. These parts are the bridge, which is the top part that goes down from between your eyes; the tip, which is the very end of the nose; and then the nostrils, those two openings that let us breathe, along with the wings on either side. Each of these bits has its own general shape that you can simplify, and that's where the magic happens for drawing.
For the bridge, you might think of it as a flat plane or a slightly curved box. The tip, more often than not, can be imagined as a ball or a rounded cube. And the nostrils, well, they are usually like little curved shapes, almost like commas or very stretched-out teardrops, with the wings of the nose forming the outer edges. By breaking the nose down into these three simpler forms – a kind of box for the bridge, a sphere for the tip, and some curved shapes for the nostrils – you can begin to place them on your drawing surface. This way of seeing things makes learning how to draw a nose much less intimidating and a lot more manageable, honestly.
When you start with these basic shapes, you're building a solid foundation for your drawing. It’s a bit like making a rough sketch of a house before you add the windows and doors. You get the overall structure right first. This method helps you to keep the nose in proportion with the rest of the face, and it also makes it easier to adjust things if they don't look quite right at first. So, remember: bridge, tip, and nostrils. These are your starting points for how to draw a nose that looks pretty good, right from the get-go.
Getting Started - Simple Steps for How to Draw a Nose from the Front
Your First Steps to Drawing a Nose
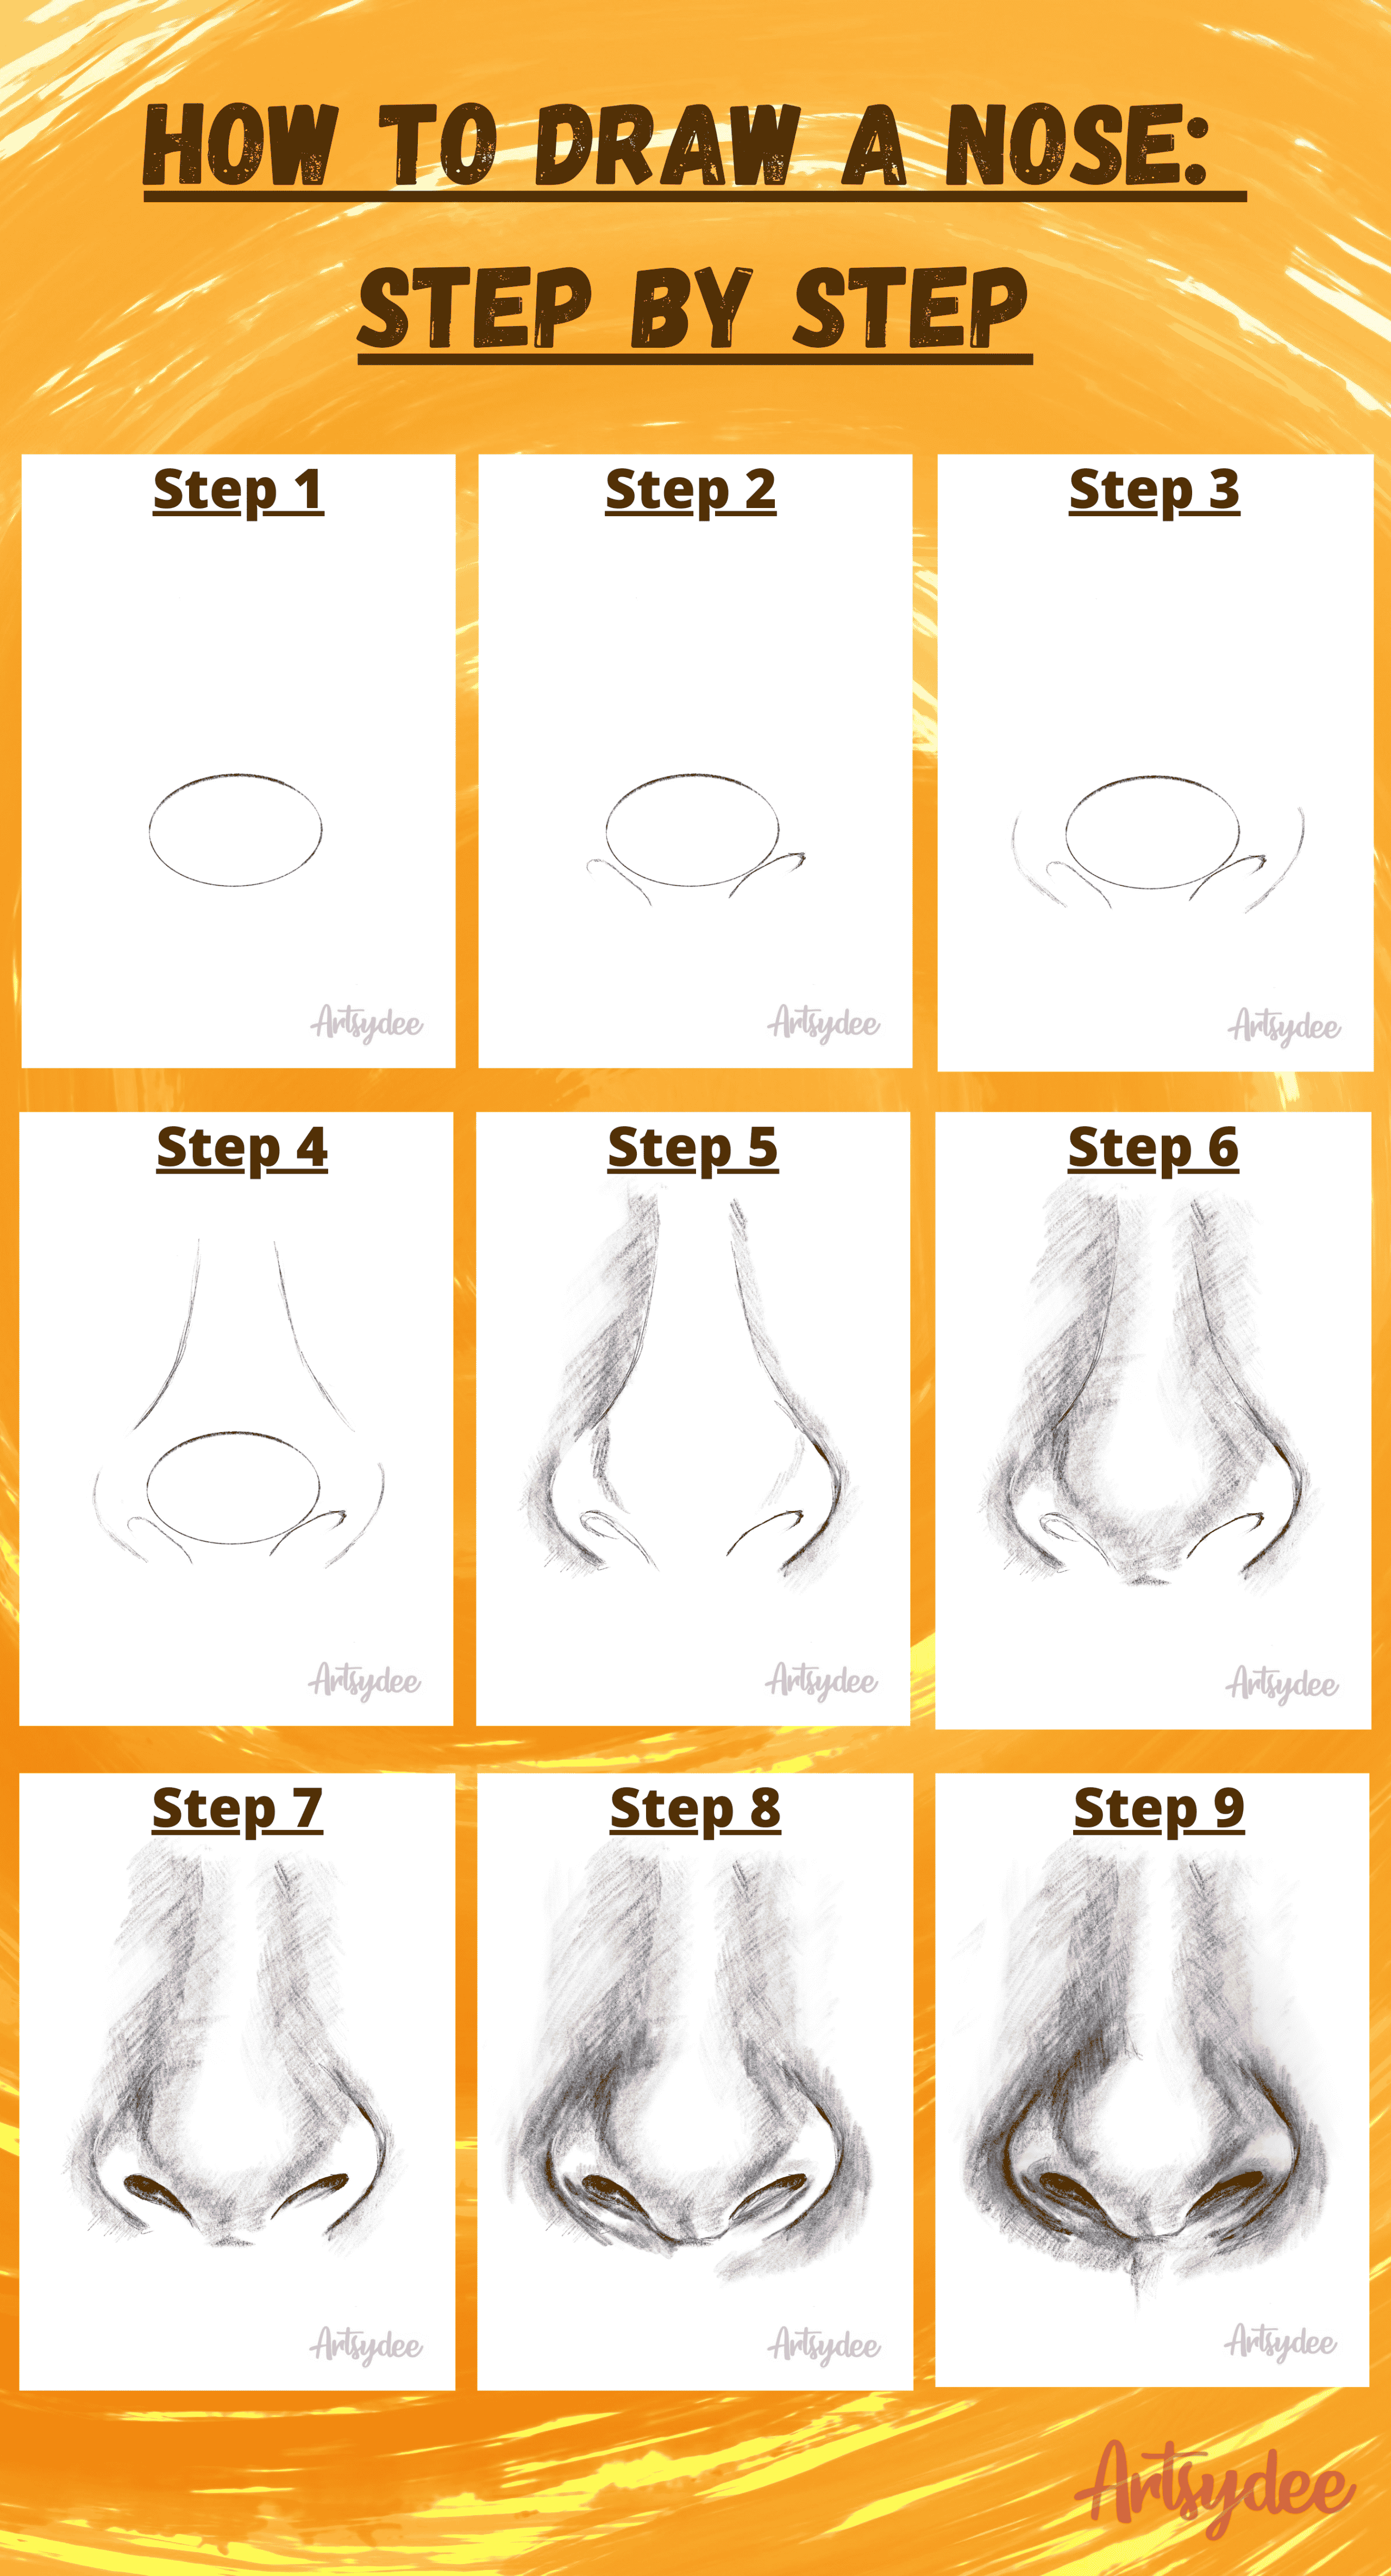
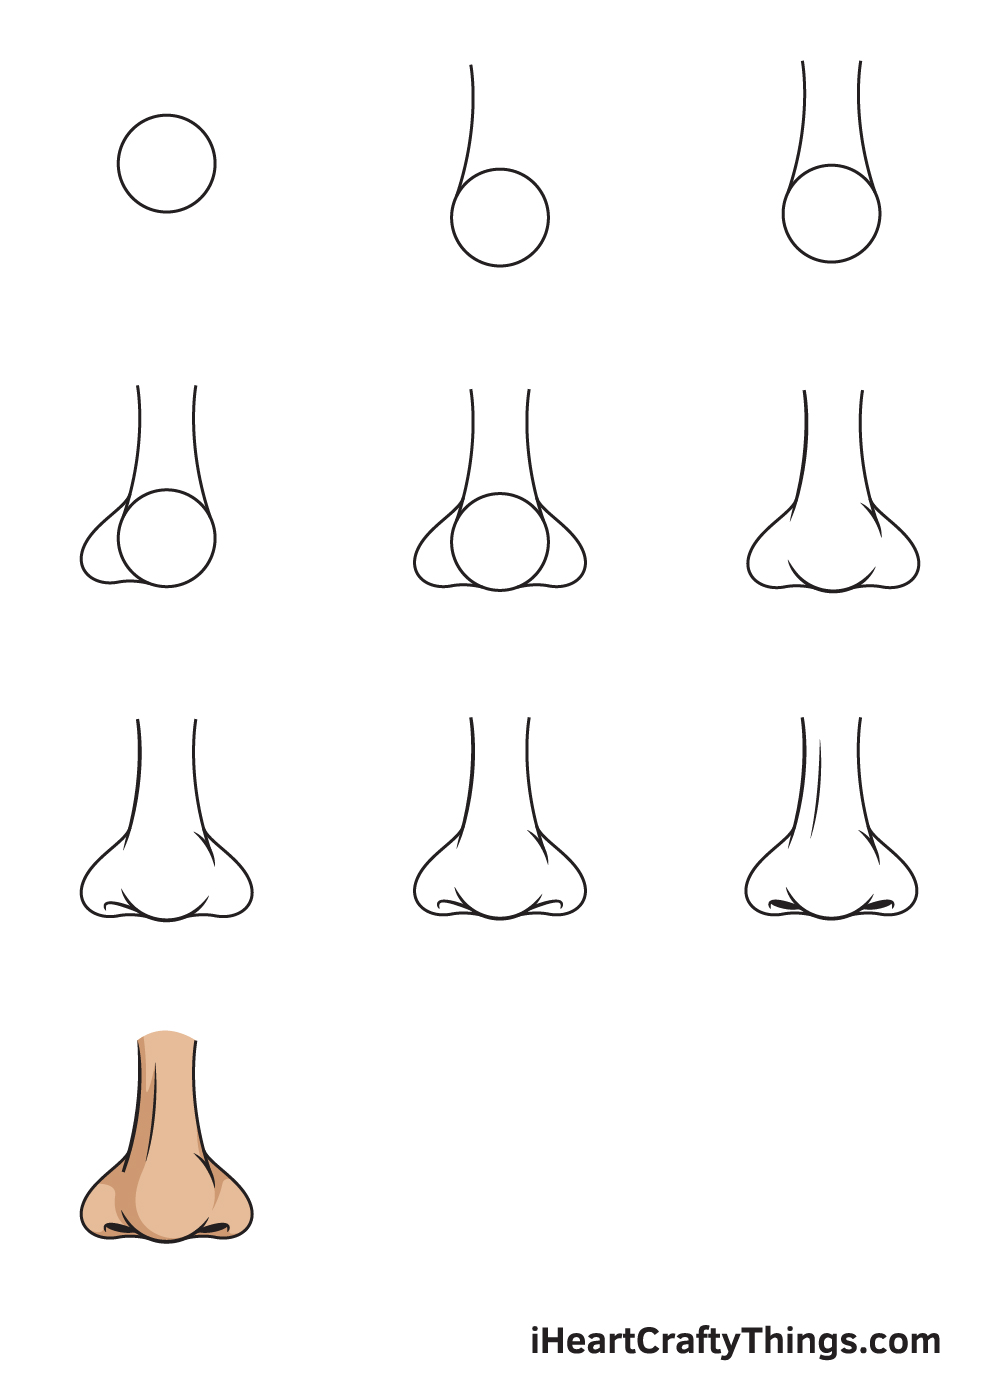
Let’s talk about how to draw a nose when you're looking straight at it. This view can be a bit tricky because you see the symmetry, or the sameness on both sides, very clearly. But don't worry, we have a very simple, step-by-step way to go about it. You'll start with just a few basic lines and shapes, and then build on those. It’s all about layering your drawing, putting down light marks first and then making them darker as you get more confident. This is how many artists approach things, actually.
First off, you might want to put down a light, vertical line right in the middle of where the nose will be. This line acts as a guide for the center of the nose and helps you keep things even on both sides. Then, about halfway down this line, you can draw a small circle or an oval. This circle will be the main part of the tip of the nose. Make sure these first lines are very light, almost barely visible, because you'll erase them later. This is just to get your basic placement right, you know.
Next, on either side of that central circle, draw two smaller, slightly flattened circles or ovals. These will be the wings of the nose, where the nostrils are. They should be roughly the same size and distance from the main circle. Think of them as little side-pods attached to the main body of the nose. Again, keep these lines light. You're basically creating a sort of three-circle snowman shape, but lying down, which is a pretty common way to start learning how to draw a nose.
Now, you can begin to connect these circles with some gentle curves. From the top of the central circle, draw two lines curving upwards and slightly inwards to form the bridge of the nose. These lines should go up towards where the eyebrows would be. Then, connect the central circle to the two side circles with soft, rounded lines to form the bottom edge of the nose. This is where the nostrils start to take shape. It’s about creating those gentle transitions, you see.
For the nostrils themselves, draw two small, dark, curved shapes within the side circles. These are the actual openings. Remember that nostrils aren't just perfectly round holes; they often have a bit of a tear-drop or comma shape. Pay attention to how they curve and where they sit. This is where a lot of the character of the nose comes out, actually. You're getting there with how to draw a nose that looks pretty real.
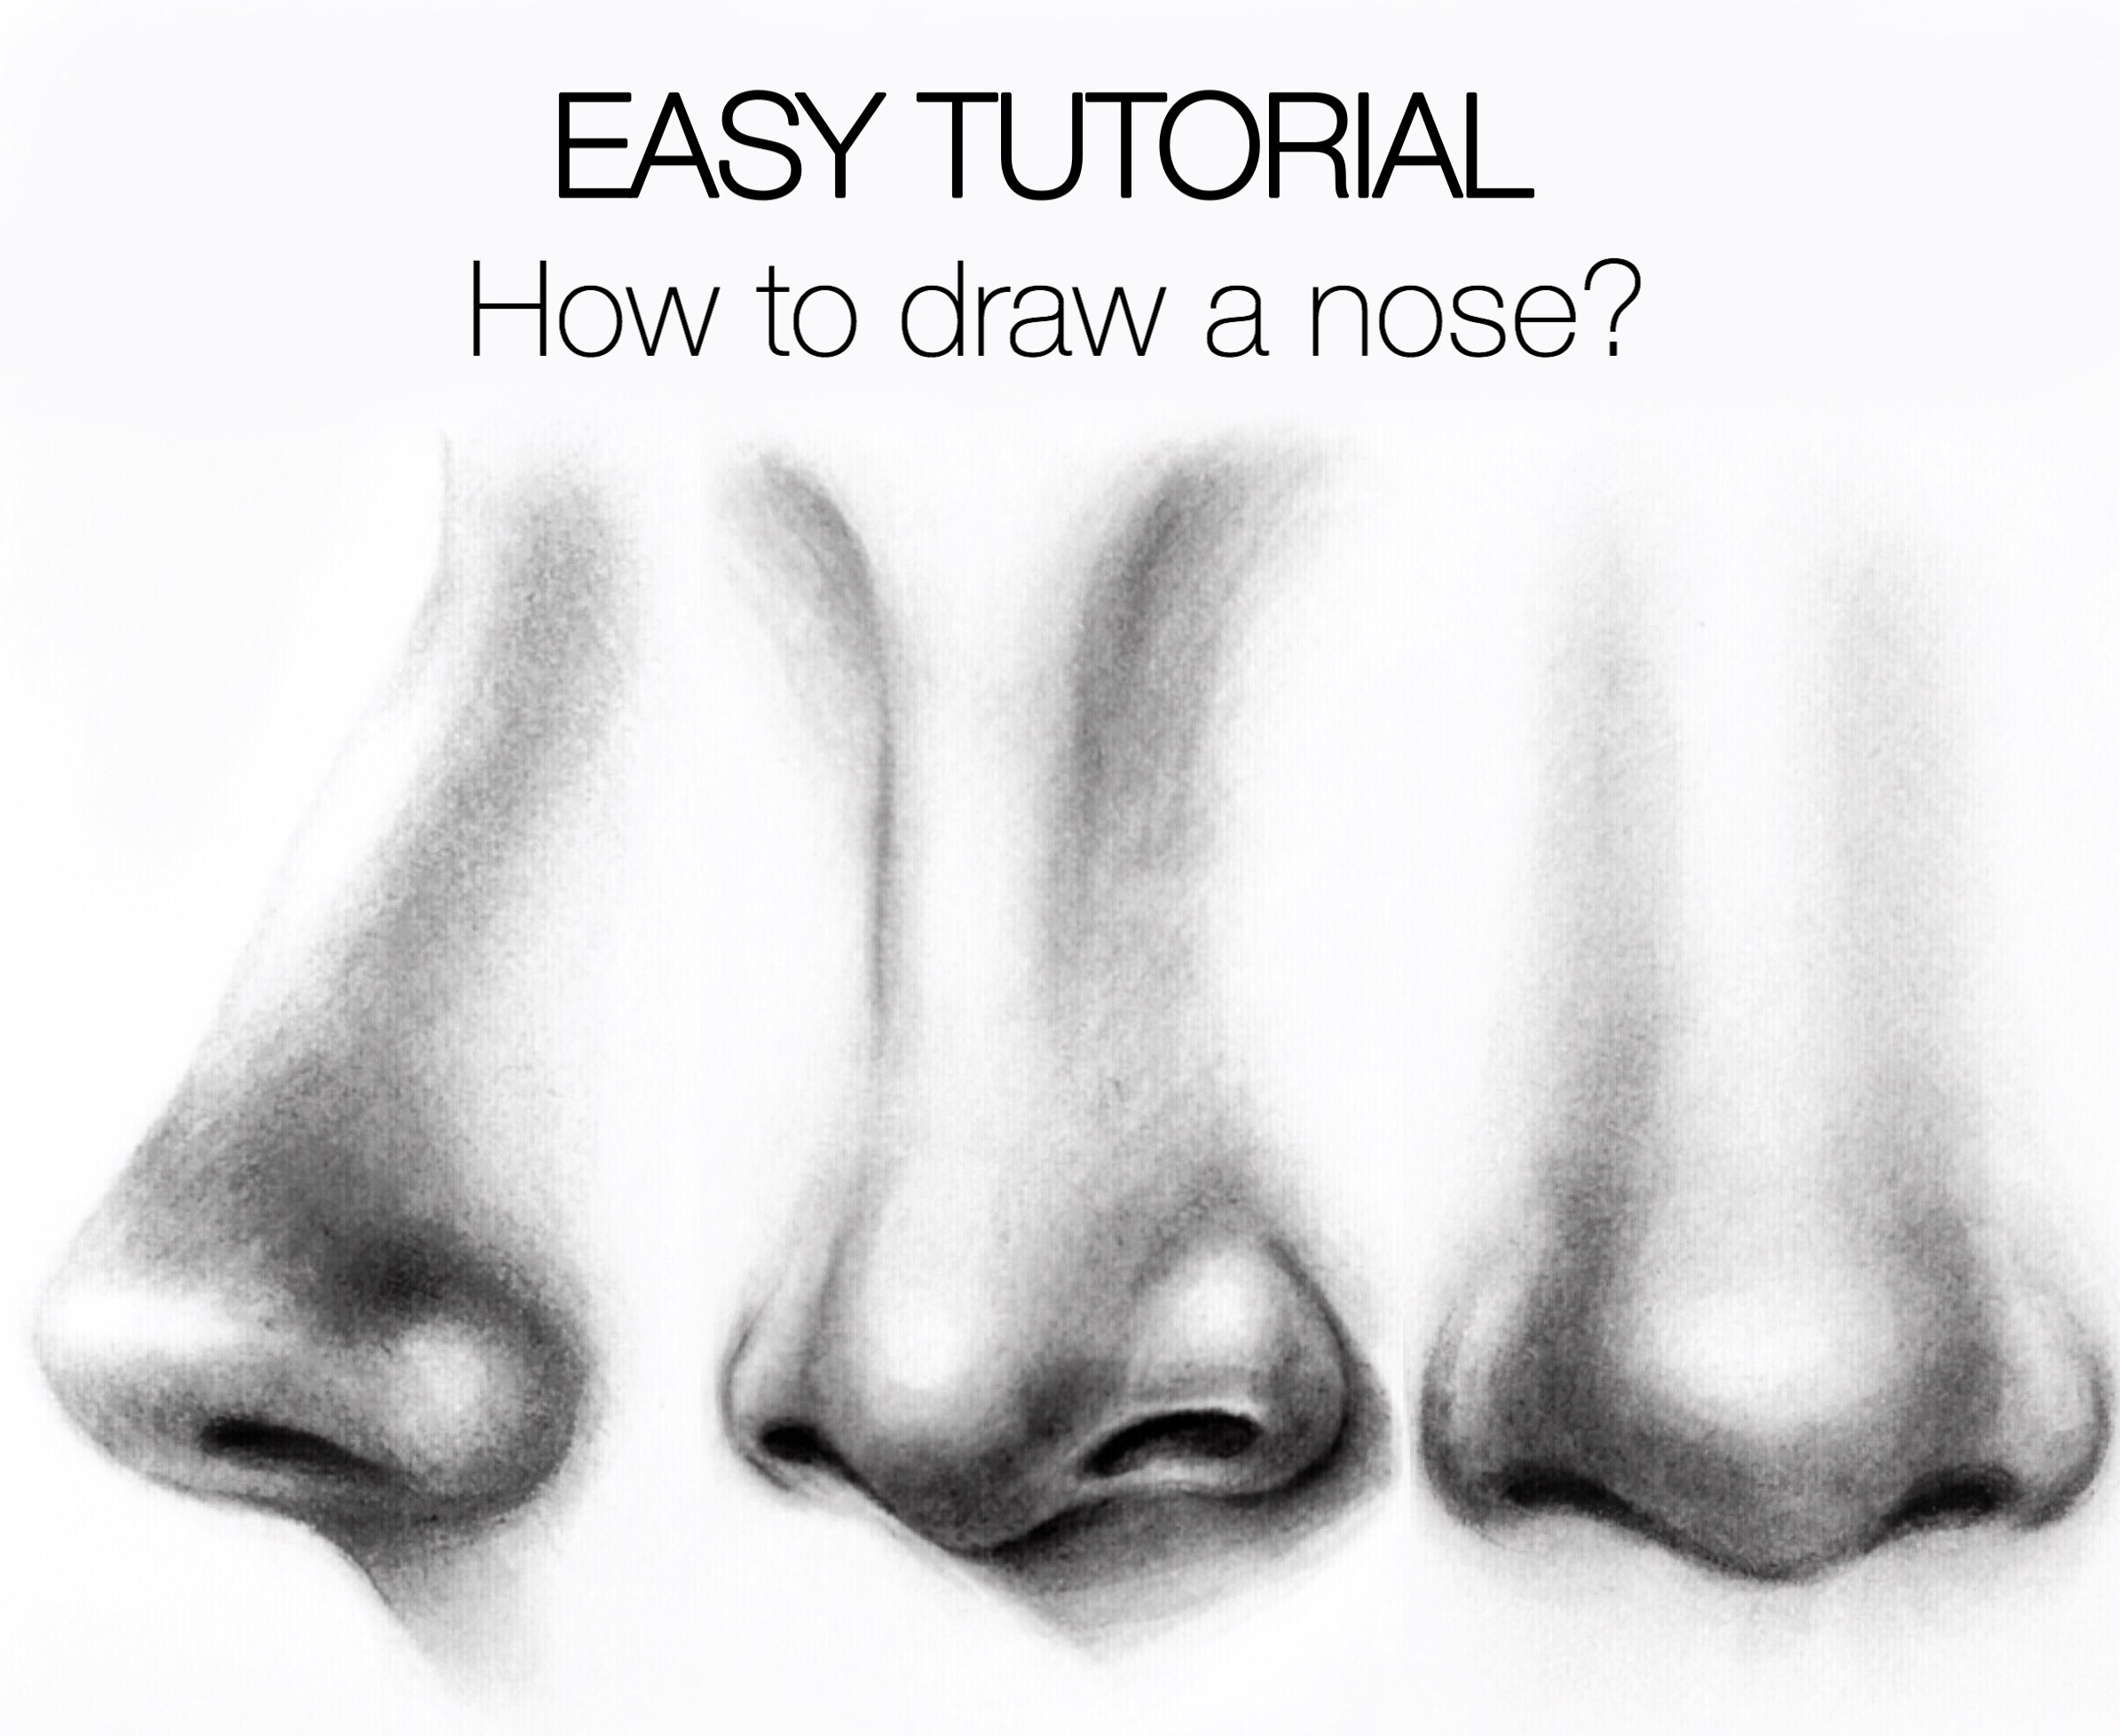
Finally, you can start to add some shading and subtle lines to give the nose more form. Think about where light would hit the nose and where shadows would naturally fall. The bridge of the nose often catches light, while the areas around the nostrils and underneath the tip tend to be darker. Use soft pencil strokes to build up these tones. Don't press too hard at first; you can always add more darkness later. This really helps make your drawing of how to draw a nose look like it's sticking out from the page, which is very cool.
What About Noses from Different Views?
Drawing How to Draw a Nose at an Angle
Drawing a nose when it's turned slightly, so you see it at an angle, adds another layer of fun to your art. It’s not just flat anymore; you get to show off its three-dimensional nature. When a nose is at an angle, one side will appear shorter or more compressed than the other, and you'll see more of one nostril than the other. This view really helps to give a face a sense of movement and life, too, which is great for dynamic portraits. It’s a bit like seeing a building from a corner rather than straight on, you know.
To start how to draw a nose at an angle, you still begin with those basic shapes, but you'll adjust their placement. The main circle for the tip will still be there, but the two smaller circles for the wings will shift. The one on the side facing you will appear larger and more prominent, while the one on the far side will seem smaller and more squashed. You might even see just a sli
🖼️ Related Images
Quick AI Summary
This AI-generated article covers How To Draw A Nose - Simple Steps For Lifelike Art with comprehensive insights and detailed analysis. The content is designed to provide valuable information while maintaining readability and engagement.
Jamir Weimann PhD
✍️ Article Author
👨💻 Jamir Weimann PhD is a passionate writer and content creator who specializes in creating engaging and informative articles. With expertise in various topics, they bring valuable insights and practical knowledge to every piece of content.
📬 Follow Jamir Weimann PhD
Stay updated with the latest articles and insights
