AI-Generated Article
This content has been automatically generated using artificial intelligence technology. While we strive for accuracy, please verify important information independently.
Learning how to draw fire might seem like a bit of a challenge, especially since flames don't really have one solid shape or a single unchanging color. They move and shift, which can make putting them down on paper feel a little intimidating. Yet, with some straightforward approaches, you can actually make this process much more manageable. We're here to help you get started with capturing that flowing movement and bright look.
You know, fire, in a way, is a symbol of comfort and home for many. It's a powerful and truly essential element when it comes to creating art, but many people who want to draw find its fluid, almost dancing forms a bit tough to get right. This guide, you see, is here to help simplify how you can create those glowing images. We will go through easy steps, showing you the fundamental aspects of drawing a flame, putting in those brilliant colors, and adding small bright bits to make it really pop.
Whether you are just starting out with your drawing journey or you have been at it for a while and are simply looking to polish up your methods, this guide has got you covered. We will show you how to draw different kinds of fire, like a steady candle flame, a warm campfire, and even a quickly moving, thrown flame, all using just a few simple tools. Basically, by following these simple actions, you too can produce a very good depiction of fire on your paper.
Table of Contents
- What Makes Drawing Fire Seem Tricky?
- Getting Started - How to Draw Fire for Beginners
- Understanding Fire's Appearance - How to Draw Fire's Shape and Light
- Adding Color and Spark to Your Fire Drawing
- How to Draw a Candle Flame
- How to Draw a Campfire
- Tips for Drawing Realistic Fire and Smoke
- Practicing Your Fire Drawing Skills
What Makes Drawing Fire Seem Tricky?
Drawing flames can, you know, feel a little difficult at times. This is because they don't really hold one solid shape, nor do they stay one single color. Fire, you see, is dynamic; it moves and changes all the time. This constant motion can make it seem like a really hard thing to put down on paper. Many aspiring artists often find that trying to capture these fluid, almost dancing forms is quite a challenge. It's almost like trying to draw something that never stands still, which, naturally, can be a bit frustrating for anyone picking up a pencil.
The very nature of fire means it is always shifting, always changing its appearance. It's not like drawing a still object, like a book or a cup, that stays put. Instead, fire flickers, it dances, and its light changes depending on what it is burning and how much air it is getting. This lack of a fixed outline or a steady hue means that artists have to think a little differently about how they approach it. You can't just trace an outline; you have to think about movement and light. So, in some respects, it requires a slightly different way of looking at things when you are creating your artwork.
However, even with these apparent difficulties, there are some pretty simple methods you can use to make the process much easier for yourself. We will help break down exactly how to draw flames in a way that simplifies things. It’s basically about understanding a few key principles rather than trying to copy every single flicker. We will look at ways to simplify the initial steps, making the whole thing feel less like a big task and more like a rewarding experience once you start to get the hang of it. You know, it really is about breaking it down into smaller, more manageable pieces.
Getting Started - How to Draw Fire for Beginners
If you are just beginning to learn how to draw fire, a good way to start is by sketching a smooth, curving line on the left side of your paper. This line, you see, will become the outer edge of your flame. It is perfectly fine if this curve is a little bit irregular; in fact, that can make your flame look more natural, more like real fire. This first step helps you establish the basic flow of the flame before you add any more details. It's almost like setting the stage for what is to come in your drawing.
After you have that first curving line down, you might want to try drawing a single, flickering flame first. This helps you get a feel for the movement and shape without trying to draw a whole big fire all at once. It’s a bit like learning to walk before you run. You can focus on how that one flame moves and changes, which can give you a better idea of how to approach larger fires later on. Basically, this simple practice helps build your confidence and your understanding of how fire behaves on paper.
For those who are just starting out, or even younger kids who are picking up a pencil, these early steps are designed to be very easy to follow along with. You will have a great time seeing your flame take shape. It is not about making something perfect right away, but about getting comfortable with the general idea of how to make fire appear on your page. So, grab your drawing tools, and let's get that creative spark going. This initial approach is, in a way, very forgiving and helps you build a solid foundation.
Understanding Fire's Appearance - How to Draw Fire's Shape and Light
To really get a good handle on how to draw fire, it helps a great deal to understand a few things about its basic appearance. This includes its overall form, how transparent it can seem, and how it acts with the things around it. Fire, you see, does not have a solid, fixed shape like a block of wood. Instead, it is constantly moving, changing its outline as it burns. This means you are drawing something that is always in motion, which can be a bit different from drawing static objects. You are trying to capture a feeling of constant movement on a still surface.
When you look at fire, you will notice that it is not completely opaque. You can often see through parts of it, especially the edges, which means it has a degree of transparency. This is an important aspect to consider when you are putting colors down, as it affects how bright or how dim certain parts of your flame will look. It’s about letting some of the background show through, which gives the fire a lighter, more ethereal quality. So, in some respects, thinking about how light passes through the flame is very helpful for making it look real.
Also, fire interacts with its surroundings in very noticeable ways. It casts light, it creates shadows, and it can even make the air around it seem wavy due to the heat. When you are drawing, thinking about how the fire lights up the things near it can really make your picture come alive. For instance, if your fire is in a dark space, the glow it gives off will be much more noticeable than if it is in a brightly lit room. This interaction with its environment is, you know, a key part of making your fire drawing look convincing and full of life.
Adding Color and Spark to Your Fire Drawing
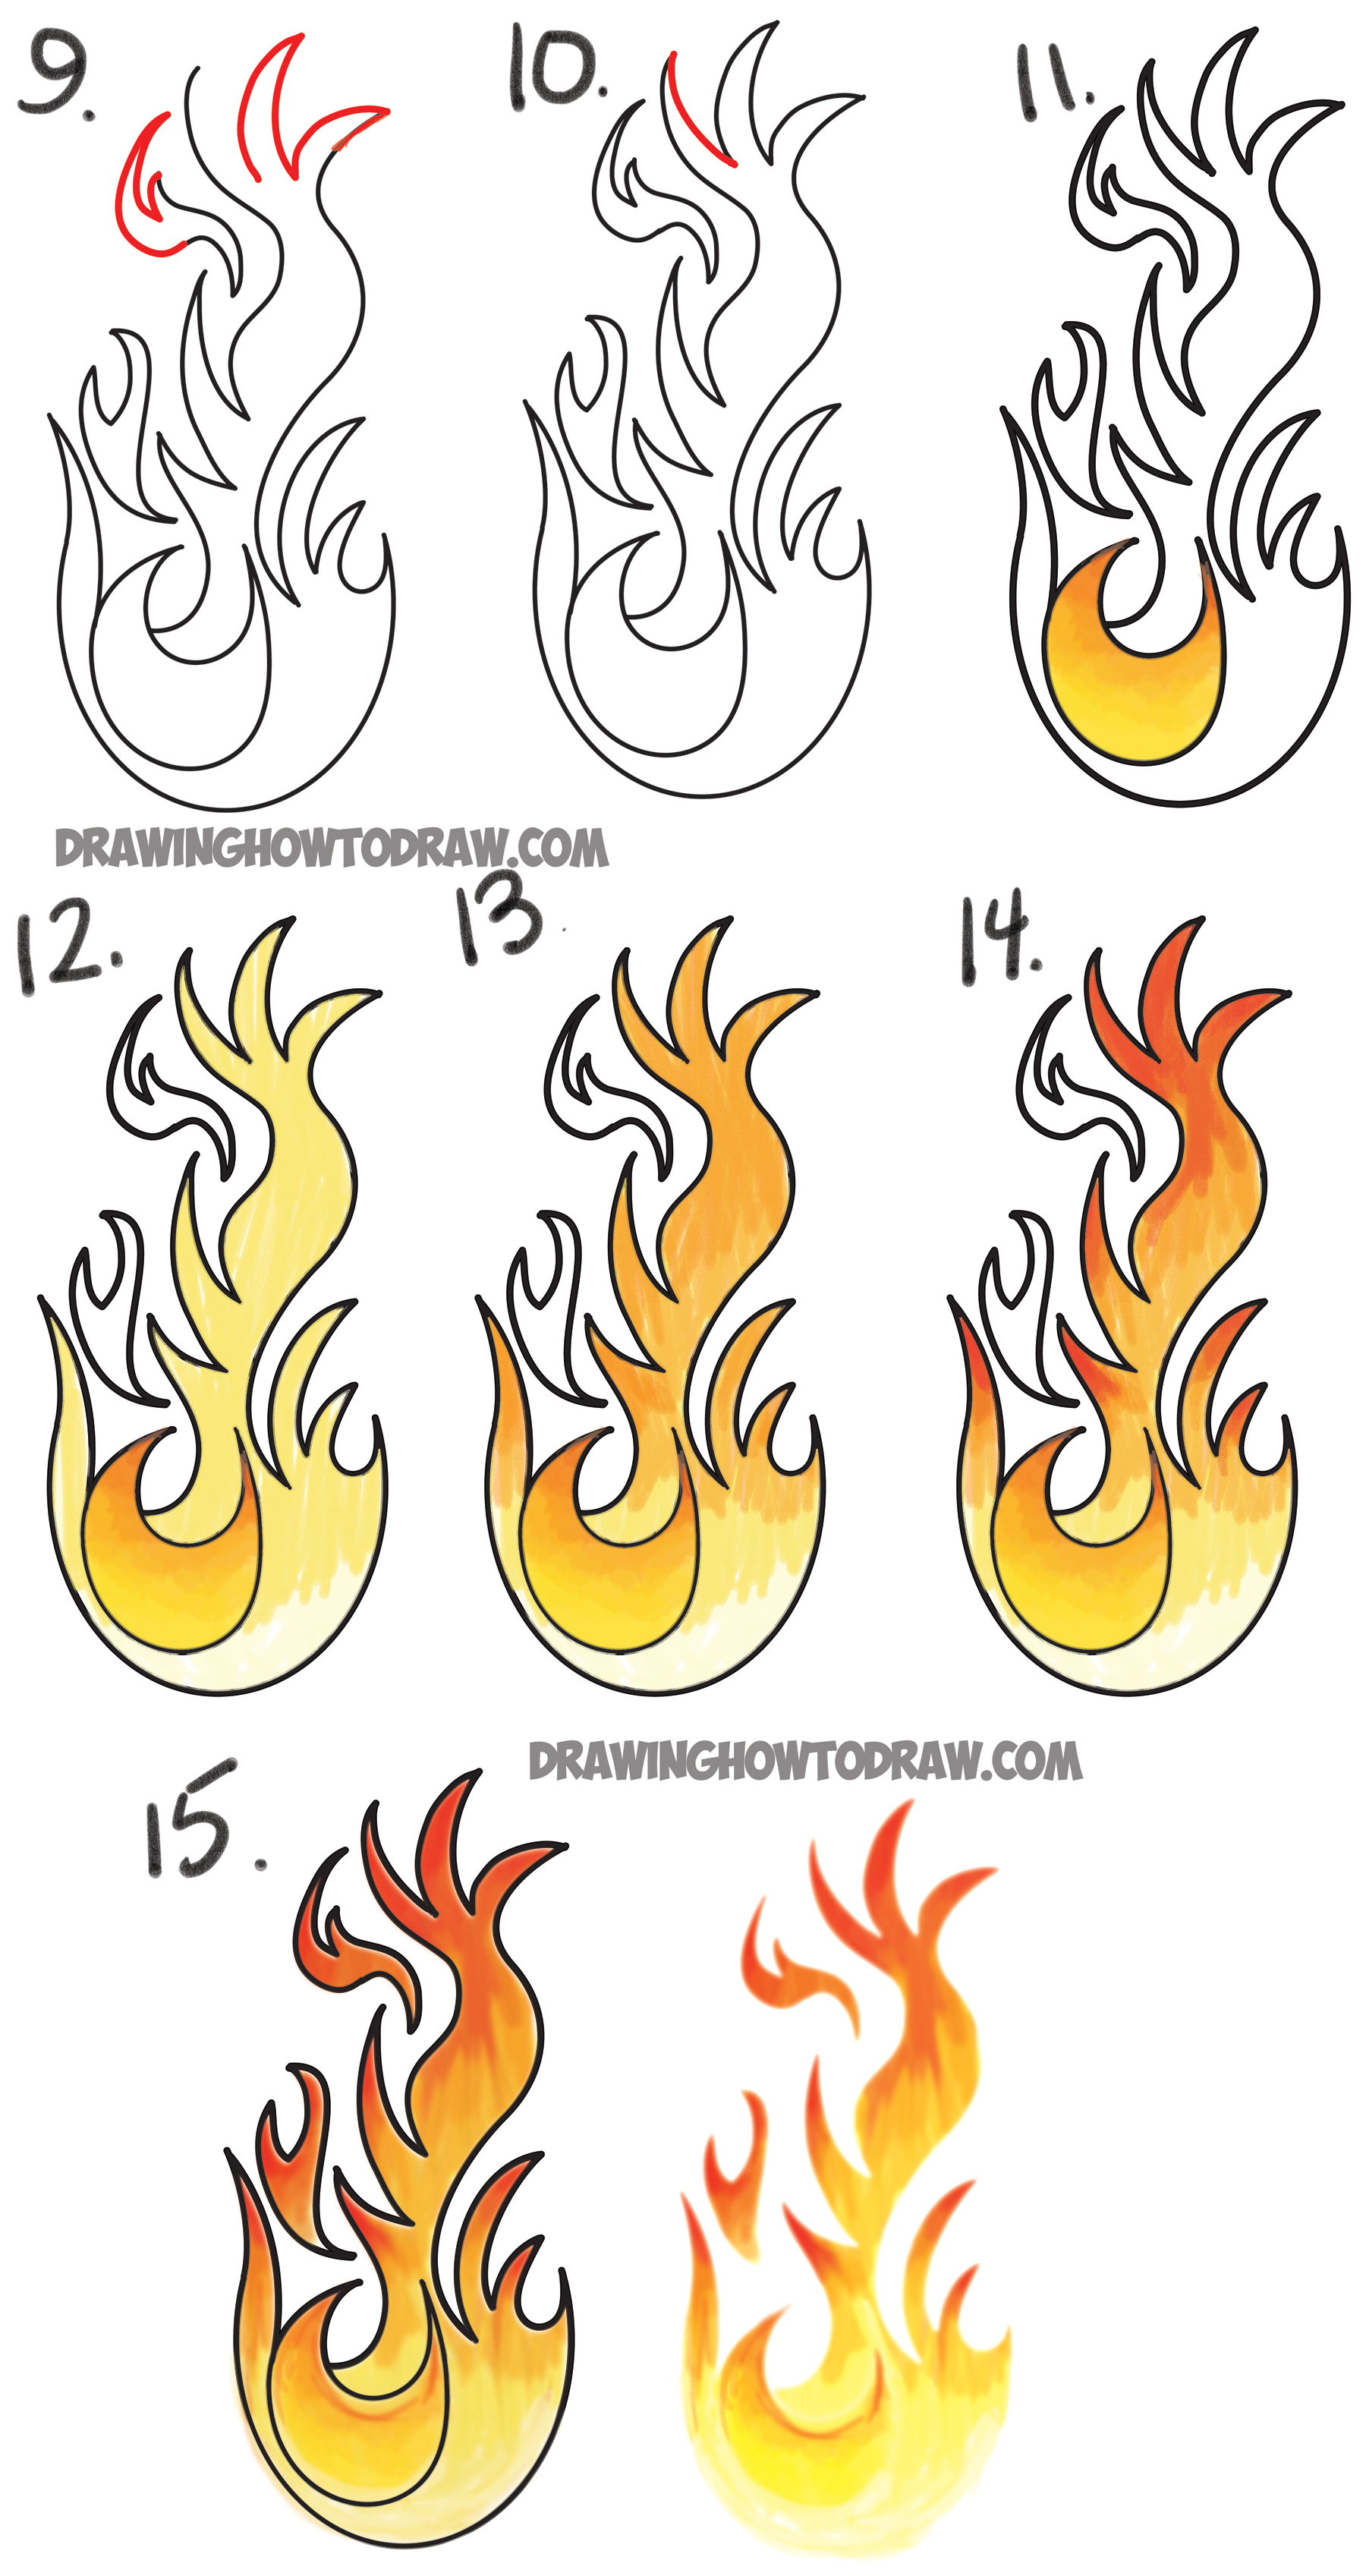
Once you have a good handle on the shape and movement of your flame, the next step in how to draw fire is to add some really bright colors and little bits of light that look like sparks. When you are putting down your colors, it is often a good idea to start with a very bright yellow in the center of your flame. This yellow represents the hottest part of the fire, where the light is most intense. From there, you can gradually add other colors, moving outward from the center. This way, you are building up the color in layers, which gives your fire a sense of depth and warmth.
After the bright yellow, you can then start to blend in oranges and reds as you move towards the outer edges of the flame. These colors show the cooler parts of the fire, where the heat is less intense. The key is to make these color changes smooth, so they flow into each other rather than having harsh lines. This blending gives the fire that fluid, natural look. It is almost like painting a sunset, where one color melts into the next. So, you know, thinking about how colors transition is quite important here.
To really make your fire drawing pop, you can add small, bright bits that look like sparks flying off the main flame. These can be tiny dots or very small, quick lines of bright yellow or white. They don't need to be many, but just a few here and there can give the feeling of movement and energy, making your fire seem more alive. These little details, you see, can make a very big difference in how realistic your fire appears. It’s basically about adding those tiny elements that bring the whole picture together and make it feel more dynamic.
How to Draw a Candle Flame
Drawing a candle flame is a fantastic way to practice your fire drawing skills because it is a relatively contained and steady form of fire. To start, you will want to create a very simple, tear-drop shape for the main body of the flame. This shape is typically a bit wider at the bottom and tapers to a point at the top. You are, in a way, creating a basic outline that you can then fill in with color and light. It is a good idea to think about how a real candle flame looks, often with a slight wobble or flicker, even when it seems still.
For a candle flame, especially one against a dark background, you will want to use very bright colors in the center. Start with a very light yellow or even white at the very core of the flame, right above the wick. This represents the hottest, most luminous part. Then, as you move outward from that bright core, you can introduce warmer yellows and oranges. The idea is to create a glow that seems to emanate from within. This method, you know, helps to give the flame a real sense of depth and intensity, making it look like it's truly giving off light.
The transparency of a candle flame is also something to consider. The outer edges might appear a bit softer, almost see-through, especially as they reach their peak. You can achieve this by using lighter, more subtle strokes on the edges, allowing the background to show through a little. This helps to separate the flame from the air around it and gives it a more delicate look. So, basically, by focusing on these subtle shifts in color and transparency, you can create a very convincing candle flame that seems to flicker right off the page.
How to Draw a Campfire
Drawing a campfire presents a slightly different kind of challenge compared to a single candle flame, mainly because it involves multiple flames and often a lighter background. When you are drawing a campfire, you will want to think about creating several overlapping, dancing flame shapes rather than just one. These shapes can be a bit more irregular, reflecting the way wood burns and how air moves through the fire. You are, in a way, capturing a more chaotic, yet still beautiful, form of fire. It is about showing how many individual flames come together to make one big fire.
For a campfire, especially one with a light background, you will still want to use bright yellows and oranges for the main body of the flames. However, since the background might be lighter, you might need to make your colors even more intense in the core to make them stand out. Think about how the light from the fire would interact with the surrounding elements, like logs or rocks. The fire's glow would cast light on these things, and you can show this by adding hints of orange or yellow to the parts of the logs closest to the flames. This interaction, you see, helps ground your fire in its setting.
Adding smoke is also a very important part of drawing a campfire. Smoke typically rises from the fire in swirling, soft gray or dark shapes. It is usually less defined than the flames themselves, often appearing as gentle plumes that drift upwards. You can use soft, blended strokes to create the look of smoke, making sure it seems to fade into the air as it goes higher. So, you know, including these smoky elements can really add to the overall feeling of a warm, crackling campfire, making your drawing feel more complete and real.
Tips for Drawing Realistic Fire and Smoke
To make your fire and smoke drawings look truly real, there are a few general tips that can really help. One important thing is to remember that fire is always moving, so your lines should reflect that. Avoid making your flame shapes too rigid or perfectly symmetrical. Instead, try to give them a natural flow, almost like they are swaying in a gentle breeze. This fluidity, you see, is what gives fire its lifelike quality. It's about capturing that sense of constant, almost organic, motion, which is basically what fire is all about.
When it comes to color, layering is a very useful technique. Start with your brightest, hottest colors in the center of the flame, like those very bright yellows and whites. Then, gradually build up the layers with oranges and reds as you move towards the outer parts. This creates a natural gradient, making the fire seem to glow from within. Also, consider how light from the fire affects the things around it. The light will make nearby objects seem brighter, and their colors might even take on a warm tint. This interaction is, you know, key to making your fire feel like it's actually illuminating its surroundings.
For smoke, think about its texture and movement. Smoke is generally softer and less defined than flames. It tends to rise and swirl, often appearing as soft, billowy shapes. Use lighter, more diffused strokes for smoke, and remember that it typically gets lighter and less dense as it rises higher into the air. The color of smoke can vary too, from dark grays to lighter, almost transparent whites, depending on the type of fire and how much oxygen it is getting. So, in some respects, paying attention to these details can really make your fire and smoke drawings look very convincing and full of life.
Practicing Your Fire Drawing Skills
The best way to get better at how to draw fire is, you know, simply to keep practicing. Drawing flames can seem a bit tricky at first, but once you get a grasp of the basic steps, it really does become much easier. Whether you are someone who is just starting out with drawing or a more experienced artist looking to make your skills even better, this guide has given you some good places to begin. It is about taking the time to try out the different methods and seeing what works best for you. Basically, the more you draw, the more comfortable you will become with capturing the unique look of fire.
You might want to try drawing a single flickering flame over and over again. This helps you get a feel for the movement and the way light plays on the flame without having to worry about a whole big scene. You can also experiment with different colors and different ways of blending them to see what kind of effects you can create. Remember, fire is very dynamic, so don't be afraid to let your lines and colors have a bit of a free flow. It is almost like learning a dance; you need to feel the rhythm of the movement to really get it right.
There are many resources out there that can help you continue to learn. You might find video guides that show you someone else's method for drawing fire, or even time-lapse videos of artists creating very realistic flames. Seeing how others approach the process can give you new ideas and ways to think about your own drawing. So, keep your drawing tools ready, and let's get those artistic flames burning brightly. The more you practice, the more you will find that drawing fire can be a truly enjoyable and very rewarding experience.
🖼️ Related Images


Quick AI Summary
This AI-generated article covers How To Draw Fire with comprehensive insights and detailed analysis. The content is designed to provide valuable information while maintaining readability and engagement.
Angus Wisozk
✍️ Article Author
👨💻 Angus Wisozk is a passionate writer and content creator who specializes in creating engaging and informative articles. With expertise in various topics, they bring valuable insights and practical knowledge to every piece of content.
📬 Follow Angus Wisozk
Stay updated with the latest articles and insights

