AI-Generated Article
This content has been automatically generated using artificial intelligence technology. While we strive for accuracy, please verify important information independently.
Have you ever looked at a skeleton and thought, "Wow, I wish I could draw that?" Well, you are in luck! Making a picture of a bony frame can seem like a big task, but it is actually quite a rewarding experience, and it is something anyone can learn to do. We are going to go through it together, step by step, so you can create your own bony figure.
This whole process is, you know, a bit like putting together a puzzle, but with your pencil and paper. It is not about being a super artist right away. It is about taking one small action after another, building up the picture piece by piece. We are going to break down the entire body frame, from the top of the spine down to the very tips of the toes, making each part easy to understand and put on paper.
So, get ready to pick up your pencil and a sheet of paper. We will cover everything from the central support column to the chest protector, the hip structure, and all the long parts that help you move. By the time we are done, you will have a good grasp of how to draw a skeleton, and you might even discover a new creative interest, too it's almost a certainty.
- Julia Berolzheimer House
- Cactus Lane
- Stefanie Mannaerts
- Amybell Onlyfans
- Consulado General De La Republica Dominicana Washington Heights
Table of Contents
- Getting Started with How to Draw a Skeleton - What Do You Need?
- Laying the Groundwork - Broad Strokes for Your Skeleton Drawing
- Building the Core - How to Draw the Spine and Ribcage?
- Adding the Foundation - The Pelvis in Your Skeleton Drawing
- Reaching Out - How to Draw the Arms and Hands?
- Standing Tall - How to Draw the Legs and Feet for Your Skeleton?
- Refining Your Creation - Adding Finer Details to Your Skeleton
- Bringing It All Together - Simple Steps for a Great Skeleton Drawing
Getting Started with How to Draw a Skeleton - What Do You Need?
Before we even make a single mark, it is a good idea to gather your supplies. You do not need anything fancy, just some basic things that you probably already have around. A simple pencil, maybe one that is not too dark at first, works well. You will also want some paper, any kind will do, and a soft rubber to fix any lines you want to change. That is pretty much it for your physical tools, you know, to begin this creative effort.
Beyond the physical items, a good frame of mind helps a lot. Try to have a little patience with yourself, especially if this is new to you. Making pictures of things is about seeing shapes and putting them down, and that takes a little looking. It is not about being perfect from the very start, but rather about enjoying the process of learning and creating. So, just a little bit of calm and a willingness to try things out will serve you well, is that something you can bring?
Laying the Groundwork - Broad Strokes for Your Skeleton Drawing
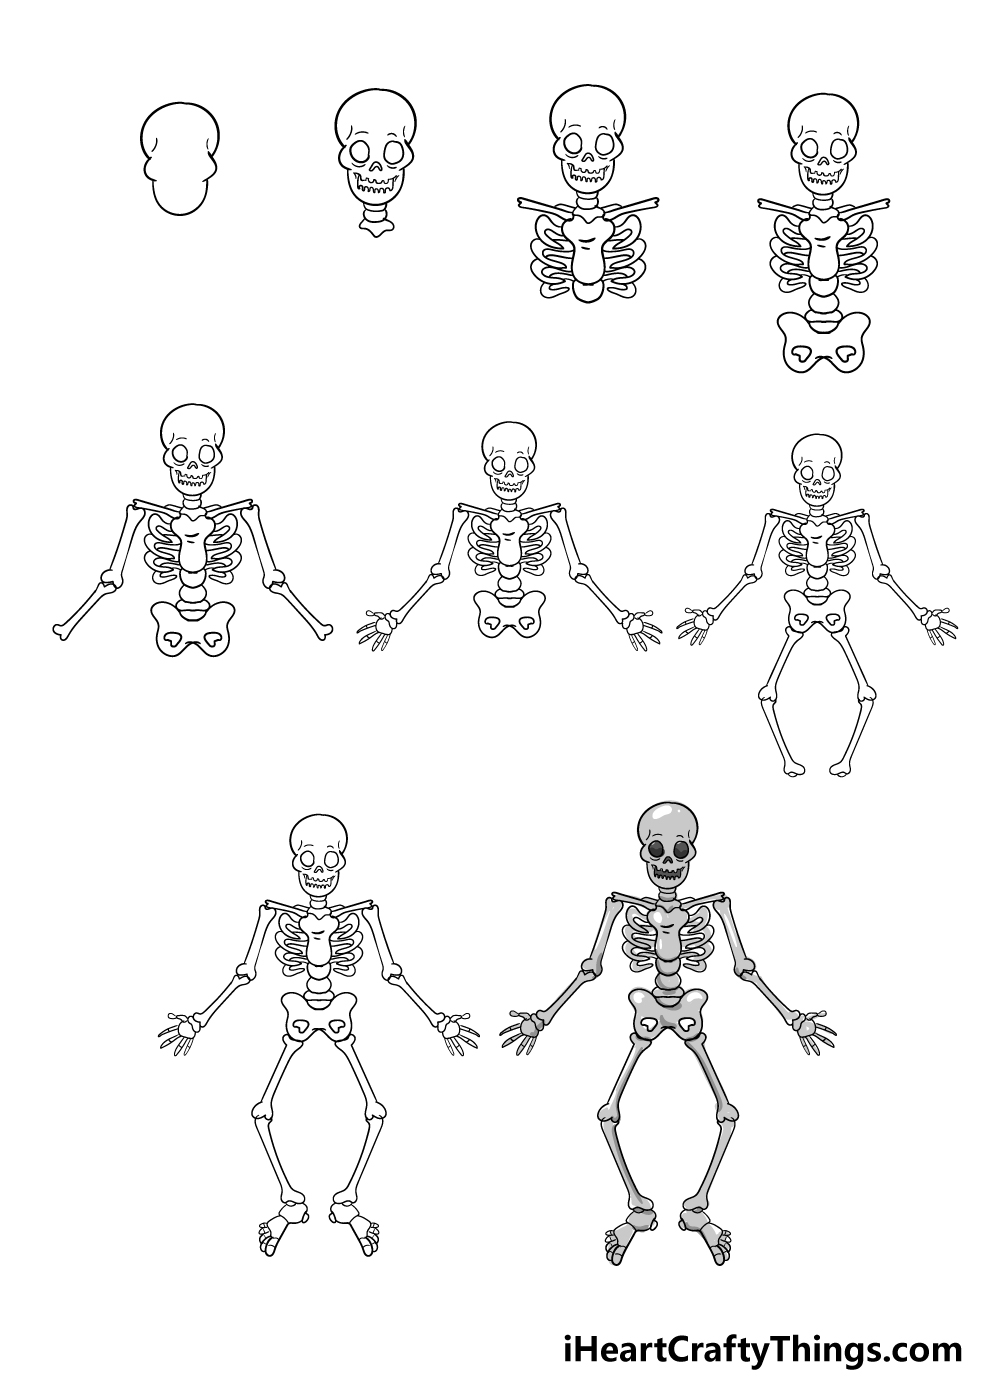
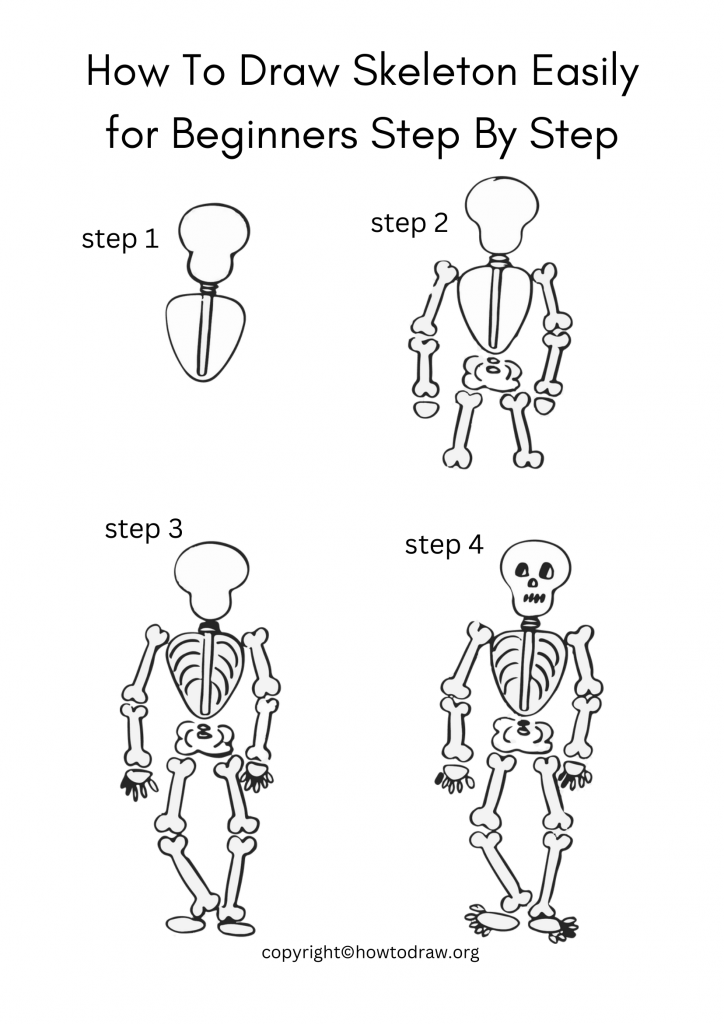
The very first action we will take is to sketch out the overall shape of your skeleton. Think of this as making a rough plan. You are not trying to draw every tiny bone yet. Instead, we are using big, sweeping lines to get the general size and placement of the main parts. This initial stage is about getting the proportions right, so your bony figure looks like it could stand up straight, or sit in a chair, or whatever pose you choose. It is a bit like setting up the framework of a building, really.
When you are doing this, try to see the skeleton not as a collection of separate pieces, but as a single form. Use light lines for these first marks, because you will probably want to adjust them as you go. For example, you might draw a long, slightly curved line for the spine's general path, and then simple oval or box shapes for where the head, chest, and hip areas will be. This helps to make sure everything fits together nicely on your paper. It is, you know, a very good way to start any picture.
Building the Core - How to Draw the Spine and Ribcage?
Now that you have a rough outline, let us focus on the very center of the skeleton: the backbone and the chest protector. The backbone, or spine, is the main support column. It is not a straight stick; it has a natural curve to it, a bit like an 'S' shape when viewed from the side. We will start by refining that initial curved line you made, adding small sections to hint at the individual bone pieces that make it up. This central line is, you know, pretty important for how the rest of the body hangs.
Once you have a good sense of the backbone, we can move on to the chest protector, which is often called the ribcage. This part protects the body's inner workings. It is shaped somewhat like a cage or a bell, wider at the bottom and narrower at the top. You can start by drawing two large, curved lines that come out from the backbone and then connect at the front. Think of it as a series of curved strips that wrap around. This will give your skeleton a solid middle section, so to speak, and it is actually quite fun to see it take shape.
Adding the Foundation - The Pelvis in Your Skeleton Drawing
After the backbone and chest protector, the next big piece to add is the hip bone structure, also known as the pelvis. This part sits at the bottom of the backbone and serves as the sturdy base for the legs. It is shaped a bit like a butterfly or a wide bowl, with two large, wing-like pieces on either side. We will draw this by first sketching a general, somewhat oval shape where the hips would be, connecting it to the end of the backbone. This helps, you know, to get the right position.
The hip bone structure is really important because it is where the long bones of the legs connect. When you are drawing it, try to capture its broad, somewhat flattened appearance. You do not need to make every tiny curve perfect at this stage, just get the main shape down. Think of it as a strong, wide support. Getting this piece right helps make the rest of your skeleton look stable and ready to stand, which is actually quite satisfying to see.
Reaching Out - How to Draw the Arms and Hands?
With the main body parts in place, we can now add the long parts that help you reach and grab: the arms and hands. Each arm has three main sections. There is the upper arm bone, which goes from the shoulder to the elbow. Then there are two bones in the forearm, from the elbow to the wrist. Finally, there is the hand itself, with all its smaller bones for the palm and fingers. We will start by drawing simple lines for these main arm sections, making sure they are the right length compared to the body. This is, you know, a good way to keep proportions correct.
When you are putting in the arms, pay a little attention to where the joints are. The shoulder is a ball-and-socket joint, meaning it can move in many directions. The elbow is more like a hinge, allowing bending. The wrist also has many small bones that give it flexibility. For the hands, you can begin with a simple, somewhat rectangular shape for the palm, then add lines for the fingers. You do not need to draw every single finger bone, just get the overall shape and length right. This will give your skeleton a good sense of being able to interact with its surroundings, so it is almost like it could wave.
Standing Tall - How to Draw the Legs and Feet for Your Skeleton?
Next up are the long parts that help you stand and walk: the legs and feet. Just like the arms, each leg has main sections. There is the longest bone, the thigh bone, which connects to the hip structure. Below that are two bones in the lower leg, from the knee to the ankle. And then there is the foot, with its many bones that allow for balance and movement. We will draw these with simple lines first, making sure their length is in good relation to the rest of your skeleton. This is, you know, a pretty important step for giving your skeleton a grounded feel.
The connections for the legs are also important. The thigh bone fits into the hip structure, forming a strong joint. The knee is a complex hinge, allowing the lower leg to bend. For the feet, start with a wedge shape or a flattened oval for the main part, then add lines for the toes. You do not need to make every single toe bone, just get the general form and how it connects to the lower leg. Making sure these parts are in good relation to each other helps your skeleton look like it could actually support itself, which is actually quite satisfying.
Refining Your Creation - Adding Finer Details to Your Skeleton
Once you have all the main parts sketched out with broad lines, it is time to go back and add the smaller, more exact parts. This is where your skeleton really starts to look like a collection of bones rather than just simple shapes. You will use your pencil to go over your light lines, making them darker and more defined. Think about the curves and bumps on each bone, the way they connect at the joints, and any openings or features you notice in pictures of skeletons. This is, you know, where the picture gets its character.
For example, instead of just a curved line for a rib, you might add a slight thickening to show its form, or a small bump where it connects. For the skull, you can begin to hint at the eye openings and the nose area. This stage is about looking closely and making your lines more precise. You can also start to add a little bit of shading to give the bones a sense of roundness and depth. This helps them pop off the page a bit, which is actually quite a nice effect.
Bringing It All Together - Simple Steps for a Great Skeleton Drawing
So, we have gone through the process of building your skeleton picture from the ground up. You started with big, sweeping lines to get the overall shape and proportions. Then, you worked on the central backbone and the chest protector, giving your skeleton its core. After that, you added the hip structure, which provides a strong base. We then moved on to the long parts for reaching and standing, the arms and legs, making sure their connections looked right. Finally, you added the smaller, more exact parts and a bit of shading to bring it all to life. This entire sequence of actions is, you know, a very good way to approach any drawing.
The most important thing now is to keep practicing. Every time you try to make a picture of a skeleton, you will get a little better at seeing the shapes and putting them down on paper. You might want to look at different pictures of skeletons to get ideas for different poses or ways to show the bones. Remember, this is about having fun and learning something new. You have already taken the first big steps, and with a little more effort, you will be making really good bony figures in no time, which is actually quite a neat skill to have.
🖼️ Related Images

Quick AI Summary
This AI-generated article covers How To Draw A Skeleton - A Friendly Guide with comprehensive insights and detailed analysis. The content is designed to provide valuable information while maintaining readability and engagement.
Ashton Paucek
✍️ Article Author
👨💻 Ashton Paucek is a passionate writer and content creator who specializes in creating engaging and informative articles. With expertise in various topics, they bring valuable insights and practical knowledge to every piece of content.
📬 Follow Ashton Paucek
Stay updated with the latest articles and insights
